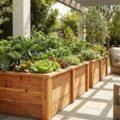
Raised bed gardening has transformed the landscape of modern home horticulture, offering a blend of aesthetic appeal and practical functionality that traditional in-ground planting often lacks. Whether you are looking to enhance your home’s curb appeal or seeking a more ergonomic way to tend to your favorite blooms, building a raised flower bed is a rewarding DIY project that provides immediate visual impact. By elevating your garden, you gain complete control over soil quality, drainage, and structural design, allowing for a more diverse range of floral displays that thrive regardless of your native soil conditions, says 480 Realty Phoenix.
The shift toward raised structures in ornamental gardening is driven by both the desire for better plant health and the need for more manageable gardening spaces. These elevated beds act as architectural focal points, defining garden paths and creating clean lines that complement any home style. Moreover, the physical benefits of raised beds—reducing the need for bending and kneeling—make gardening accessible to a wider range of enthusiasts. This guide will walk you through every stage of the process, from selecting the most durable materials and preparing your site to the final assembly and soil preparation needed for a stunning, long-lasting floral display.
Choosing the Right Materials for Your Flower Bed
Selecting the right material is the foundation of a long-lasting raised flower bed. While cedar and redwood are the gold standards for their natural rot resistance, alternative materials like corrugated metal or masonry blocks offer unique aesthetic and cost-saving benefits for modern DIY gardeners. The material you choose will dictate not only the lifespan of your structure but also the overall style of your landscape and the safety of your soil environment.
For most DIY enthusiasts, wood remains the preferred choice due to its ease of construction and natural warmth. According to the University of Minnesota Extension (2024), cedar and redwood contain natural oils that resist decay for 10-15 years without chemical treatment. This natural longevity makes them ideal for ornamental flower beds where aesthetics and durability are equally important. While pressure-treated lumber is more affordable, many modern gardeners prefer untreated rot-resistant species to avoid any potential leaching of chemicals into the soil, particularly if they plan to rotate edible flowers or herbs into their floral displays.
Masonry materials, such as bricks, stone, or concrete blocks, provide a permanent and formal look that complements traditional home architectures. These materials are virtually indestructible and offer excellent thermal mass, which can help regulate soil temperature for sensitive flower roots during the heat of summer. However, masonry requires a level of labor-intensive site preparation and a solid foundation to prevent shifting over time. For a more contemporary or industrial look, corrugated metal panels framed with wood have become increasingly popular, offering a lightweight and modern aesthetic that is both durable and relatively simple to assemble.
| Material Type | Estimated Cost | Lifespan (Years) | DIY Difficulty | Best For |
|---|---|---|---|---|
| Cedar / Redwood | High | 10–15 | Low | Natural, premium look |
| Untreated Pine | Low | 3–5 | Low | Budget-friendly, temporary |
| Corrugated Metal | Medium | 15–20 | Medium | Modern, industrial style |
| Stone / Brick | High | 50+ | High | Permanent, formal gardens |
| Composite Lumber | High | 25+ | Low | Low-maintenance, uniform |
Each material has its own set of trade-offs, and the best choice often depends on your specific garden goals and budget. If you are building a raised bed for the first time, cedar is often the most forgiving material to work with, as it is easy to cut and screw while providing a professional finish. For those seeking a more permanent architectural feature, investing the extra time and effort into a masonry or composite structure will pay dividends in the decades to come, as these materials require almost zero maintenance once installed.
Step-by-Step Construction Guide
Building a basic 4×4 raised flower bed involves four primary stages: site preparation, cutting lumber to precision, assembling the frame with galvanized hardware, and installing protective liners. This process ensures structural integrity while preventing soil-to-wood contact that can accelerate rot in non-treated materials. By following a systematic approach, even a beginner DIYer can create a professional-grade structure that will serve as a beautiful focal point for years to come.
The first step in any successful build is selecting a level site that receives at least six to eight hours of direct sunlight. According to Oregon State University (2023), leveling the site is the most critical step to prevent soil erosion and structural shifting over time. Once the location is chosen, use a shovel to remove any existing grass or weeds, and then use a long board and a carpenter’s level to ensure the ground is perfectly flat. This preparation prevents the bed from leaning or bowing under the weight of wet soil and plants.
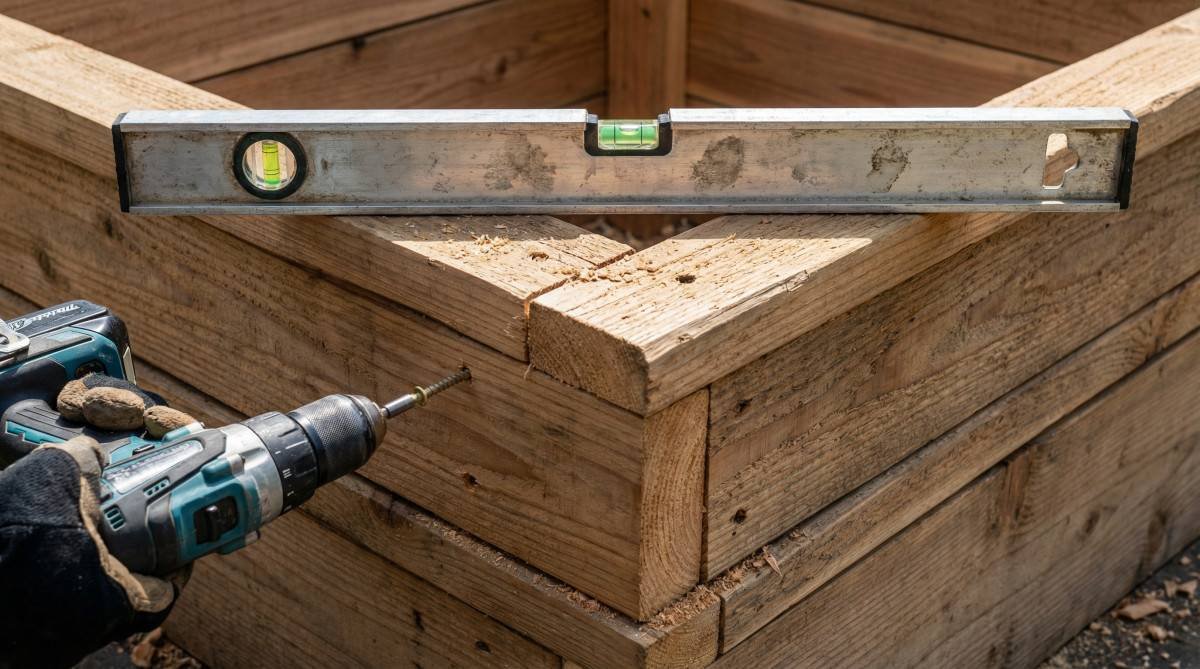
After the site is prepared, measure and cut your lumber according to your design plans. For a standard 4-foot by 4-foot bed, you will need four 4-foot boards for the sides and four 10-inch to 12-inch 4×4 posts for the corners. Use a miter saw or circular saw for clean, square cuts that will join tightly. Pre-drilling pilot holes is essential to prevent the wood from splitting when you drive in your 3-inch deck screws. Assemble the frame by attaching the side boards to the corner posts, ensuring each corner is square using a rafter square.
Once the frame is assembled and in place, the final construction step is installing protective liners. Line the bottom of the bed with a layer of 1/2-inch hardware cloth (wire mesh) to prevent burrowing pests like gophers or moles from entering. Over the hardware cloth, add a layer of landscape fabric or heavy-duty cardboard to suppress any remaining weed growth from below. For non-rot-resistant woods like pine, you may also choose to line the inside walls with heavy plastic sheeting, being careful not to cover the bottom to ensure proper drainage. This final touch protects your investment and ensures your flowers have a clean, pest-free environment in which to thrive.
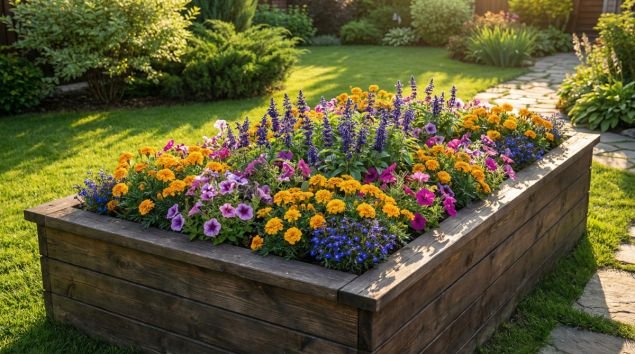
Designing for Bloom Cycles and Curb Appeal
Unlike vegetable beds, raised flower beds should be designed with “bloom layering” in mind, placing taller perennials in the center or back and trailing annuals along the edges. Integrating various heights and colors ensures year-round visual interest and maximizes the architectural impact of the raised structure on your home’s landscape. A well-designed raised bed can be a focal point for your entire property, enhancing curb appeal and creating a welcoming entrance.
To achieve a professional look, many landscape designers recommend the “Thriller, Filler, Spiller” technique for raised beds. The “Thriller” is a tall, eye-catching plant that serves as the centerpiece, such as a tall delphinium or a structural ornamental grass. The “Filler” consists of mounded plants that fill the middle space with color and texture, like petunias or marigolds. Finally, the “Spiller” includes trailing plants that cascade over the edges of the bed, such as sweet alyssum or trailing lobelia, softening the hard lines of the wood or stone structure.
Consider the bloom cycles of each plant to ensure your raised bed remains vibrant from early spring through late fall. By mixing early-blooming bulbs like tulips and daffodils with mid-summer perennials like coneflowers and black-eyed Susans, you can create a continuous display of color. Incorporating evergreen shrubs or ornamental grasses also provides structural interest during the winter months when most flowers are dormant. This thoughtful layering of heights and bloom times transforms a simple DIY box into a sophisticated piece of living art.
When designing for curb appeal, the orientation and placement of your raised bed are just as important as the plants themselves. Aligning the bed with the architectural lines of your home or using materials that complement your siding and trim can create a cohesive and intentional look. For a more formal appearance, symmetrical beds on either side of a walkway can frame an entrance beautifully. For a more natural or cottage-style garden, staggered beds of varying heights can add depth and dimension to your landscape, making even a small yard feel like a curated botanical garden.
Soil Science: The Perfect Mix for Flowers
The ideal soil for a raised flower bed is a “soilless” mix of 60% high-quality topsoil, 30% organic compost, and 10% aeration material like perlite or vermiculite. This ratio provides the necessary drainage for delicate flower roots while maintaining the nutrient density required for continuous blooming throughout the growing season. Because raised beds are elevated above the ground, they tend to dry out more quickly and compact faster than traditional garden soil, making a specialized mix essential for long-term plant health.
According to the University of Maryland Extension (2024), raised beds require specialized soil mixes because standard garden soil compacts too quickly in confined structures. This compaction can lead to poor drainage and limited root growth, which can be detrimental to delicate flowers. By using a soilless mix that includes peat moss or coconut coir, you can improve moisture retention while still allowing excess water to drain away freely. This balance is critical for preventing root rot and ensuring that your flowers have access to the nutrients they need to produce vibrant blooms.
For the best results, consider the “Mel’s Mix” adaptation for flower beds, which emphasizes a high proportion of organic compost to provide a steady supply of nutrients. Compost not only feeds your plants but also improves the structure of the soil, making it easier for roots to penetrate and spread. Adding a slow-release organic fertilizer at the time of planting can also help sustain your flowers throughout the season, especially if you are growing heavy feeders like dahlias or roses. Regularly top-dressing your bed with fresh compost each spring will help maintain soil fertility and structure over time.
Proper drainage is another critical factor in the success of your raised flower bed. Ensure that your bed is placed on a surface that allows water to drain freely, such as soil or gravel, rather than a hard surface like concrete. If you must build your bed on a hard surface, consider adding a layer of coarse gravel at the bottom of the bed to improve drainage and prevent water from pooling around the roots. By paying close attention to the science of soil, you can create a thriving environment where your flowers can reach their full potential.
Frequently Asked Questions
How to build a raised flower bed for beginners?
To build a raised flower bed for beginners, start by choosing a simple 4×4 design using cedar or redwood boards and corner posts. Level the site, cut the boards to length, and assemble the frame using deck screws before filling it with a high-quality soilless mix of topsoil and compost.
What is the best wood for a raised flower bed?
The best wood for a raised flower bed is cedar or redwood because they are naturally rot-resistant and do not require chemical treatments. These species contain natural oils that prevent decay for 10-15 years, making them a safe and durable choice for ornamental and edible flowers alike.
How deep should a raised flower bed be?
A raised flower bed should be at least 6 to 12 inches deep to provide enough space for most flower roots to grow and thrive. For deeper-rooting perennials or if building on a hard surface like concrete, a depth of 18 to 24 inches is recommended to ensure adequate drainage and nutrient access.
What do I put in the bottom of a raised garden bed?
In the bottom of a raised garden bed, you should place a layer of 1/2-inch hardware cloth to prevent burrowing pests like gophers. Above the mesh, add a layer of landscape fabric or cardboard to suppress weeds while still allowing for proper drainage and earthworm movement into the soil mix.
Is it cheaper to build or buy a raised garden bed?
It is generally cheaper to build a raised garden bed yourself if you have basic tools and access to local lumber yards. While pre-made kits offer convenience, sourcing your own materials like cedar or pine allows you to customize the size and height for a fraction of the retail cost.
How do I prevent weeds in a raised bed?
To prevent weeds in a raised bed, line the bottom with landscape fabric or thick cardboard before adding your soil mix to block existing weed growth. Additionally, using a “soilless” potting mix that is free of weed seeds and maintaining a layer of organic mulch will further suppress new weed germination.
Conclusion
Building a raised flower bed is one of the most effective DIY projects for enhancing both the beauty and functionality of your home’s landscape. By taking the time to select rot-resistant materials like cedar, preparing a level site, and using a nutrient-rich soil mix, you create a controlled environment where your flowers can thrive with minimal maintenance. Whether you are aiming for a formal front-yard display or a casual backyard retreat, the elevated structure of a raised bed provides a professional, clean look that complements any garden style.
The benefits of raised bed gardening extend beyond simple aesthetics, offering improved soil health, better drainage, and a more comfortable gardening experience. As you watch your first season of blooms unfold, the investment of a single weekend’s work will be clearly visible in the vibrant colors and lush growth of your floral display. With the right planning and a bit of DIY effort, your new raised flower bed will serve as a lasting testament to your gardening skills and a beautiful addition to your home for years to come.
References
- University of Minnesota Extension (2024). Raised bed gardens.
- Oregon State University (2023). Raised bed gardening.
- University of Maryland Extension (2024). Soil for raised beds.